Setup
Setup menu
You can adjust the audio system to your desired settings.
Display “Setup” screen
Press the “SETUP” button to display the “Setup” screen.
- Select to adjust the settings for operation sounds, screen animation, etc.
- Select to set the voice settings.
- Select to adjust the settings for contrast and brightness of the screen.
- Select to adjust the settings for registering, removing, connecting and disconnecting Bluetooth® devices.
- Select to adjust the settings for contact, message, etc.
- Select to set audio settings.
- Select to turn the screen off.
- Select to set the vehicle customization.
General settings
Settings are available for adjusting the operation sounds, screen animation, etc.
Screen for general settings
- Press the “SETUP” button.
- Select “General” on the “Setup” screen.
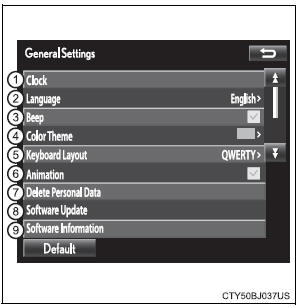
- Select to adjust the clock.
- “English”, “Français” or “Español” can be selected.
- On/off can be selected to sound beeps.
- Select to change the screen color.
- Select to change the keyboard layout.
- The animation effect for the screen can be set to on/off.
- Select to delete personal data
- Select to update program versions. For details, contact your Toyota dealer.
- Select to display the software information. Notices related to third party software used in this product are enlisted. (This includes instructions for obtaining such software, where applicable.)
To return to the default volume settings
Select “Default”, and then “Yes”.
Clock setting
- Display the “General Settings” screen. Operations up to this point can also be performed by select the clock display at the top of most screens.
- Select the items to be set.
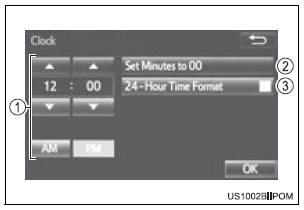
- Manual clock setting
- Set minutes to 00
- The 24-hour time format can be to on/off.
- Select “OK”.
Delete personal data
- Select “Delete Personal Data” on the “General Settings” screen.
- Select “Delete”.
Check carefully beforehand, as data cannot be retrieved once deleted.
- A confirmation screen will be displayed. Select “Yes”.
The following personal data will be deleted or changed to its default settings.
- General settings
- Audio settings
- Phone settings
Audio settings
Settings are available for adjusting the radio operation, cover art, etc.
Screen for audio settings
- Press the “SETUP” button.
- Select “Audio” on the “Setup” screen.
- Number of Radio Presets Select the number of radio preset stations.
- Display Cover Art on/off
- Automatic Sound Levelizer
Automatic sound leveliser (ASL)
- Select “Automatic Sound Levelizer”.
- Select “High”, “Mid”, “Low” or “Off”.
About Automatic Sound Leveliser (ASL)
ASL automatically adjusts the volume and tone quality according to the vehicle speed.
Display settings
Settings are available for adjusting the contrast and brightness of the screen.
Screen for display settings
- Press the “SETUP” button.
- Select “Display” on the “Setup” screen.
- Adjust screen contrast/brightness
- Adjust screen contrast/brightness of the rear view monitor camera
- Changes to day mode.
Adjusting the screen contrast/brightness
- Select “General” or “Camera” on the “Display Settings” screen.
- Adjust the display as desired by selecting “+” or “-”.
Day mode
When the headlights are turned on, the screen dims.
However, the screen can be switched to day mode by selecting “Day Mode”.
The screen will stay in day mode when the headlights are turned on until “Day Mode” is selected again.
Voice settings
This screen is used for guidance for voice command systems setting.

- Adjust the voice guidance volume setting.
- Set the voice recognition prompts “High”, “Low” or “Off”.
- Set the train voice recognition.
- Set the voice prompt interrupt on/off.
- Set the voice recognition tutorial.
To return to the default settings
Select “Default”, and then “Yes”.
Download Manual