Adjusting the seats
Front seats
Adjustment procedure
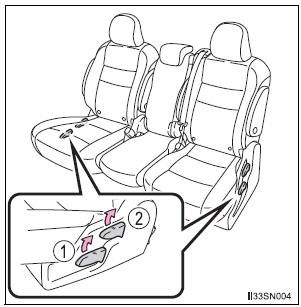
- Manual seat

- Seat position adjustment lever
- Seatback angle adjustment lever
- Vertical height adjustment lever (driver’s side only) Lumbar support adjustment switch (driver’s side only)*
*: If equipped
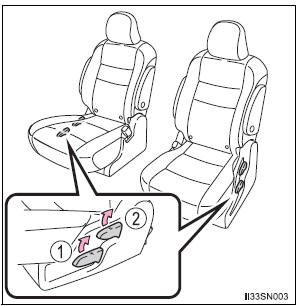
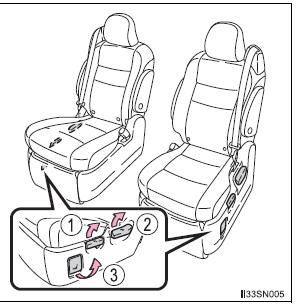
- Power seat
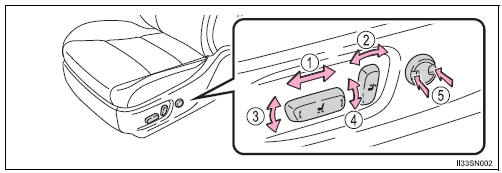
- Seat position adjustment switch
- Seatback angle adjustment switch
- Seat cushion (front) angle adjustment switch (driver’s side only)
- Vertical height adjustment switch (driver’s side only)
- Lumbar support adjustment switch (driver’s side only)
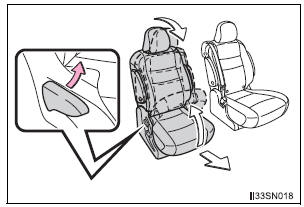
Active head restraints
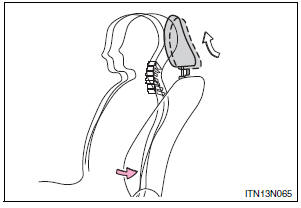
When the occupant’s lower back presses against the seatback during a rear-end collision, the head restraint moves slightly forward and upward to help reduce the risk of whiplash on the seat occupant
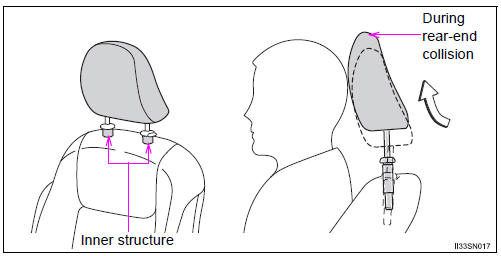
Active head restraints
Even small forces applied to the seatback may cause the head restraint to move. When a locked head restraint is pushed up forcibly, the head restraint inner structure may appear. This does not indicate a problem.
| WARNING
When adjusting the seat position
Seat adjustment
|
Rear seats
Adjustment procedure
Second seat
- Tip-up seat (7-passenger models)
- Seat position adjustment lever
- Seatback angle adjustment lever
- Tip-up seat (8-passenger models)
- Seat position adjustment lever
- Seatback angle adjustment lever
- Ottoman seat
- Seat position adjustment lever
- Seatback angle adjustment lever
- Ottoman angle adjustment lever
- AUTO ACCESS SEAT
Refer to “AUTO ACCESS SEAT OWNER’S MANUAL”.
Third seats
- Manual seat
Seatback angle adjustment strap

- Power seat

Seatback angle adjustment switch.
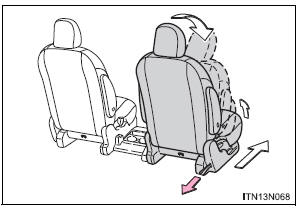
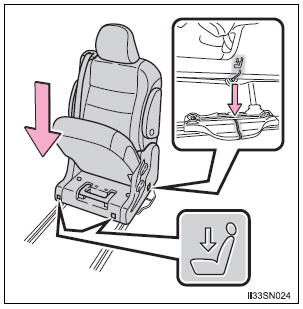
Moving a second seat for third seat access
Getting in the vehicle
- Tip-up seats
Pull the seatback angle adjustment lever and fold down the seatback. The cushion will tip up. The seat can slide forward.
Move the seat to the frontmost position.
- Ottoman seats

Pull the seatback angle adjustment lever and fold down the seatback. The seat can slide forward.
Move the seat to the frontmost position.
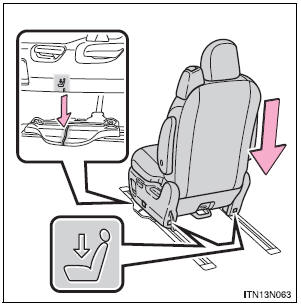
Getting out of the vehicle
- Tip-up seats
Pull the strap and fold down the seatback. The cushion will tip up. The seat can slide forward.
Move the seat to the frontmost position.
Make sure that no passenger is seated on the second seat before pulling the strap.
- Ottoman seats
Pull the strap and fold down the seatback. The seat can slide forward.
Move the seat to the frontmost position.
Make sure that no passenger is seated on the second seat before pulling the strap.
After passengers have entered/exited the vehicle
Lift up the seatback and slide the seat backward until it locks.
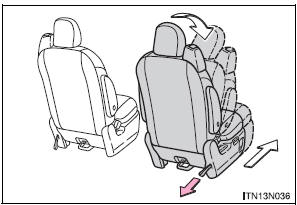
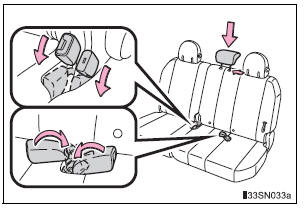
Removing the second seats
Removing the second outside seats (Tip-up seats)

- Pull the armrests up.
Pull the seatback adjustment lever and fold down the seatback.
The cushion will tip up.

- Slide the seat forward to a lock position.
- Pull the release lever under the cushion and simultaneously lift the seat to remove.
Removing the second seats (Ottoman seats)

- Pull the armrests up.
Pull the seatback adjustment lever and fold down the seatback.

- Slide the seat to a forward lock position.
- Pull the release lever behind the seatback straight back, then up. While moving the lever up, simultaneously lift the seat to remove.
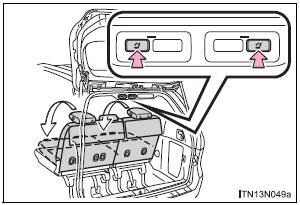
Removing the second center seat (if equipped)

- Pull the lock release strap and fold down the second center seatback.
Make sure that the head restraint is in the lowest position.

- Pull the lock release strap under the seat to remove the seat.
Retract the cushion leg.

- Stow the seat in the storage box of the luggage room (cushion side first).
Engage the stow latch buckle to hold the seat and tighten the latch strap.
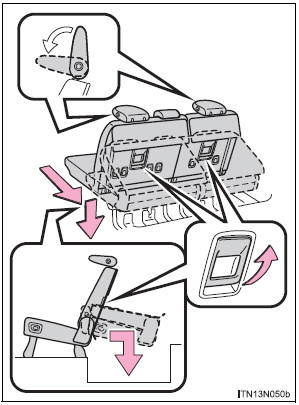
Installing the second seats
Installing the second outside seats
- Align the marking on the seat side cover to the marking on the rail cover and align the marking on the seat front/back cover to the rail.
- Tip-up seat
- Ottoman seat
- Lower the seat and engage the latches.
If you locked the seat latches unintentionally before installing securely, pull the release lever to unlock the latches.
Make sure the seat is locked in place by trying to shake the seatback and lift up the seat cushion.
Installing the second center seats (if equipped)

- Engage the rear pins with the hooks.

- Unfold the cushion leg and push down on the seat to engage the front lock.
- Unfold the seatback and lock it.
Make sure the seat is locked in place by trying to shake the seatback and lift up the seat cushion.
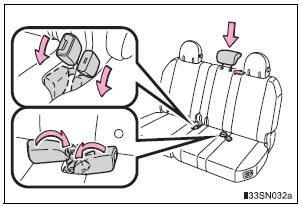
Folding down the third seats (manual seats)
Before folding the third seats
- Fold the outside head restraints and lower the center head restraint to the lowest position , and stow the seat belt buckles.
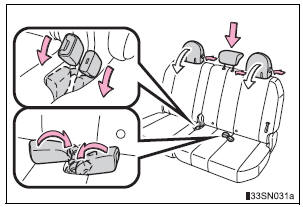
- Stow the center seat belt.
Folding down the third seatbacks
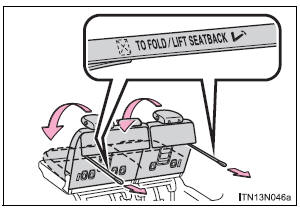
Pull the “TO FOLD/LIFT SEATBACK” strap a
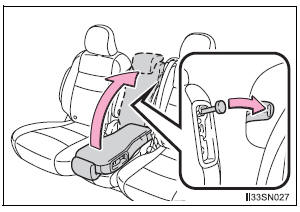
Returning the third seatbacks
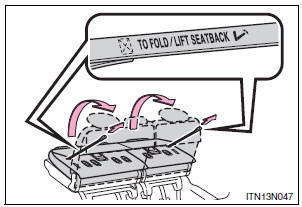
Pull the “TO FOLD/LIFT SEATBACK” strap, and raise the seatback and the outside head restraints.
Folding down the third seats (power seats)
You can operate the power third seats when the shift lever is in P.
Before folding the third seats
- Lower the center head restraint to the lowest position and stow the seat belt buckles.
- Stow the center seat belt.
Folding down the third seatbacks
Press the folding/returning switch.
Returning the third seatbacks
Press the folding/returning switch, returning switch or seatback angle adjustment switch.
Stowing the third seats (manual seats)
Before stowing or returning third seat, remove any items from the floor area to prevent interference with moving parts.
Before stowing the third seats
- Lower the center head restraint to the lowest position , and stow the seat belt buckles.
- Stow the center seat belt.
Stowing the third seats
- Pull the handle to move the seat rearward. Then push the seat down.
The outside head restraints are folded automatically.
- Push the seat against the floor.
Open the flaps.
Before returning the third seats
Be sure to move the second seats forward from the rearmost position, as they may interfere with the third seats returning operation.
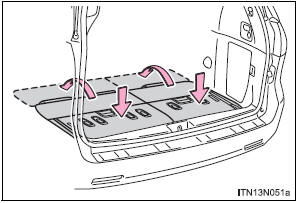
Returning the third seats
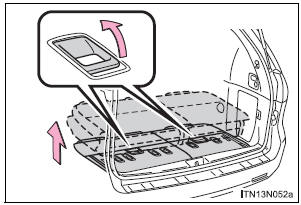
- Return the flaps.
Pull the handle and lift up the seat rearward.
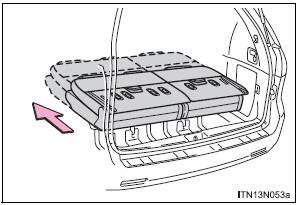
- Push the seat forward and then engage the front leg locks.
Make sure the front and rear legs are locked securely.
- Raise the seatback and the outside head restraints.
Stowing the third seats (power seats)
You can operate the power third seats when the shift lever is in P.
Before stowing or returning third seat, remove any items from the floor area to prevent interference with moving parts.
Before stowing the third seats
- Lower the center head restraint to the lowest position and stow the seat belt buckles.
- Stow the center seat belt.
Stowing the third seats

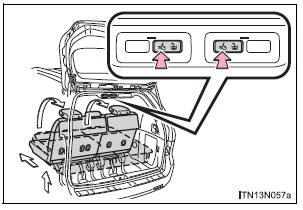
- Press and hold the stowing switch.
A beep sounds twice to indicate the start of the operation. The beep sounds again twice when the operation is completed.
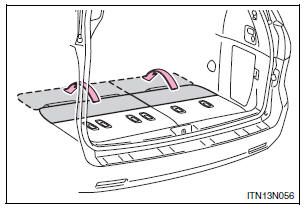
- Open the flaps.
Before returning the third seats
Be sure to move the second seats forward from the rearmost position, as they may interfere with the third seats returning operation.
Returning the third seats
- Return the flaps.
Press and hold the returning switch until the seat cushion is locked.
A beep sounds twice to indicate the start of the operation. The beep sounds again twice when the seats are locked in foldeddown position. Make sure the front and rear legs are locked securely.
- Raise the outside head restraints.
Power third seat (vehicles with power third seat)
- If the indicator light above the switches flashes three times when the folding/ returning switch is pressed, the folding operation will not start. Make sure the shift lever is in P.
- If any of the following conditions occur while the seat is operating, the seat operation will stop. The indicator light above the switches will flash three times and a beep will sound for about 10 seconds:
- An object is caught between the seatback and seat cushion.
- The stowing switch is released.
- Other power third seat switch is pushed while operating the stowing switch.
- The shift lever is moved from P when the engine switch is turned to the “ON” position (vehicles without a smart key system) or IGNITION ON mode (vehicles with a smart key system).
If the engine is started during operating, the seat operation may also be stopped.
To continue the folding operation, the seatback must be returned to its original position first.
AUTO ACCESS SEAT (if equipped)
The AUTO ACCESS SEAT cannot be removed.
“3RD SEAT” warning light (vehicles with power third seat)
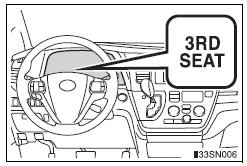
The warning light comes on if the third seat operation is not yet complete when the engine switch is turned to the “ON” position (vehicles without a smart key system) or IGNITION ON mode (vehicles with a smart key system).
| WARNING
When folding the rear seatbacks down Observe the following precautions. Failure to do so may result in death or serious injury.
Seat adjustment
After returning the rear seatbacks or installing seats Observe the following precautions. Failure to do so may result in death or serious injury.
Removing the second seats
Stowing the third seats
When adjusting the seat position or the ottoman (vehicles with Ottoman seats) Make sure to leave enough space around the feet so as not to get them caught. When using the ottoman (vehicles with Ottoman seats)
To prevent damage to the seat
Stowing the seat belt The seat belts and the buckles must be stowed before you fold down the rear seatbacks. To prevent an ottoman malfunction (vehicles with Ottoman seats)
|
Driving position memory
This feature automatically adjusts the driver’s seat and outside rear view mirrors to make entering and exiting the vehicle easier or to suit your preferences.
Power easy access system
The seat is automatically adjusted to allow the driver to enter and exit the vehicle easily.
When all of the following have been performed, the driver’s seat is automatically adjusted to a position that allows driver to enter and exit the vehicle easily.
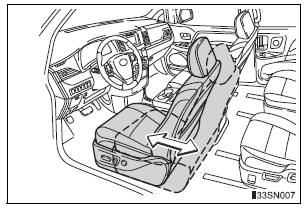
- The shift lever has been shifted to P
- The engine switch has been turned off.
- The driver’s seat belt has been unfastened When any of the following has been performed, the driver’s seat will automatically return to their original positions.
- The engine switch has been turned to ACCESSORY mode.
- The driver’s seat belt has been fastened
Operation of the power easy access system
When exiting the vehicle, the power easy access system may not operate if the seat is already close to the rearmost position, etc.
Driving position memory
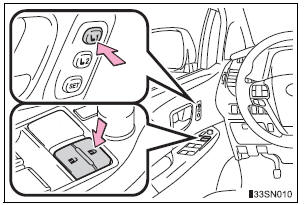
Your preferred driving position (the position of the driver’s seat and outside rear view mirrors) can be recalled by pressing a button.
Two different driving positions can be recorded into memory.
Recording procedure

- Check that the shift lever is in P.
- Turn the engine switch to IGNITION ON mode.
- Adjust the driver’s seat and outside rear view mirrors to the desired positions.
- While pressing the “SET” button, or within 3 seconds after the “SET” button is pressed, press button “1” or “2” until the signal beeps.
If the selected button has already been preset, the previously recorded position will be overwritten.
Recall procedure

- Check that the shift lever is in P.
- Turn the engine switch to IGNITION ON mode.
- Press one of the buttons for the driving position you want to recall until the signal beeps.
To stop the position recall operation part-way through
Perform any of the following:
- Press the “SET” button.
- Press button “1” or “2”.
- Operate any of the seat adjustment switches (only cancels seat position recall).
Operating the driving position memory after turning the engine switch off
Recorded seat positions can be activated up to 180 seconds after the driver’s door is opened and another 60 seconds after it is closed again.
In order to correctly use the driving position memory function
If a seat position is already in the furthest possible position and the seat is operated in the same direction, the recorded position may be slightly different when it is recalled.
Memory recall function
Each electronic key can be registered to recall your preferred driving position.
Registering procedure
Record your driving position to button “1” or “2” before performing the following: Carry only the key you want to register, and then close the driver’s door.
If 2 or more keys are in the vehicle, the driving position cannot be recorded properly.
- Check that the shift lever is in P.
- Turn the engine switch to IGNITION ON mode.
- Recall the driving position that you want to record.
- While pressing the recalled button, press and hold the door lock switch (either lock or unlock) until the signal beeps.
Recall procedure
Carry the electronic key that has been registered to the driving position, and then unlock and open the driver’s door using the smart key system or wireless remote control.
The driving position will move to the recorded position.
If the driving position is in a position that has already been recorded, the seat and outside rear view mirrors will not move.
Cancelation procedure
Carry only the key you want to cancel and then close the driver’s door.
If 2 or more keys are in the vehicle, the driving position cannot be canceled properly.
- Check that the shift lever is in P.
- Turn the engine switch to IGNITION ON mode
- While pressing the “SET” button, press and hold the door lock switch (either lock or unlock) until the signal beeps twice.
If the button could not be canceled, the signal beeps continuously for approximately 3 seconds.
Recalling the driving position using the memory recall function
- Different driving positions can be registered for each electronic key. Therefore, the driving position that is recalled may be different depending on the key being carried.
- If a door other than the driver’s door is unlocked with the smart key system, the driving position cannot be recalled. In this case, press the driving position button which has been set.
Customization
The unlock door settings of the memory recall function can be customized.
(Customizable features: )
| WARNING
Seat adjustment caution Take care during seat adjustment so that the seat does not strike the rear passenger or squeeze your body against the steering wheel. |
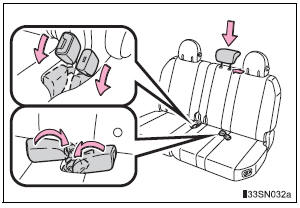
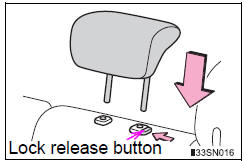
Head restraints
Head restraints are provided for all seats.
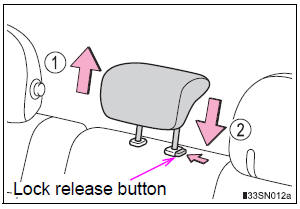
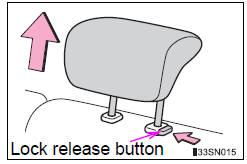
Front and second outside seats

- Up
Pull the head restraints up. - Down
Push the head restraint down while pressing the lock release button.
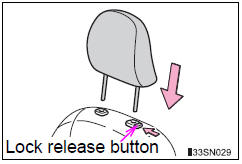
Second center* and third center seats
- Up
Pull the head restraints up. - Down
Push the head restraint down while pressing the lock release button.
*: 8-passenger models only.
Third outside seats
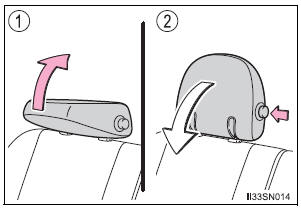
- To use
Pull the head restraints up. - To fold
Press the button
Removing the head restraints
- Front and second outside seats
Pull the head restraint up while pressing the lock release button.

- Second center* and third center seats
Pull the head restraint up while pressing the lock release button.
*: 8-passenger models only
- Third outside seats
The head restraint cannot be removed.
Installing the head restraints
- Front and second outside seats
Align the head restraint with the installation holes and push it down to the lock position.
Press and hold the lock release button when lowering the head restraint.
- Second center* and third center seats
Align the head restraint with the installation holes and push it down to the lock position.
Press and hold the lock release button when lowering the head restraint.
*: 8-passenger models only
Adjusting the height of the head restraints
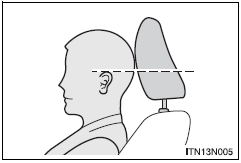
Make sure that the head restraints are adjusted so that the center of the head restraint is closest to the top of your ears.
Adjusting the center seat head restraints
Always raise the head restraint one level from the stowed position when using.
| WARNING
Head restraint precautions Observe the following precautions regarding the head restraints. Failure to do so may result in death or serious injury.
|
Download Manual