Bluetooth® phone
Using a Bluetooth® Phone
The hands-free system is a function that allows you to use your cellular phone without touching it.
This system supports Bluetooth®. Bluetooth® is a wireless data system that allows the cellular phone to wirelessly connect to the hands-free system and make/receive calls.
Before making a phone call, check the connection status, battery charge, call area and signal strength. If a Bluetooth® device cannot be connected, check the connection status on the phone screen. If the device is not connected, either register or reconnect it.
Phone screen
To display the screen shown below, press the  switch on the steering
wheel or the  button.
Several functions are available to operate on each screen that is displayed by selecting the 4 tabs.
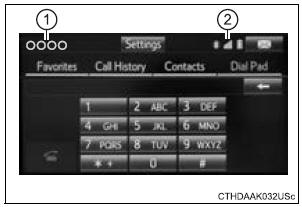
- Device name
- Bluetooth® connection status
Telephone switch
Microphone
The vehicle’s built in microphone is used when talking on the phone.
The person you are speaking to can be heard from the front speakers.
To use the hands-free system, you must register your Bluetooth® phone in the system.
Status display
You can check indicators such as signal strength and battery charge on the phone screen.
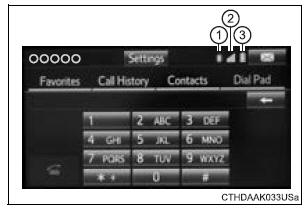
- Connection status
- Signal strength
- Battery charge

Making a call
Once a Bluetooth® phone is registered, you can make a call using the following procedure:
Dialing
- Display the phone screen.
- Select the “Dial Pad” tab and enter a phone number.
To delete the input phone number, select
 .
.
For the first digit, you can enter “+” by selecting “” for a while. - Press the
 switch on the
steering wheel or select
Dialing from the contacts list
You can dial a number from the contact data imported from your cellular phone. The system has one contact for each registered phone. Up to 2500 contacts may be stored in each contact.
- Display the phone screen.
- Select “Contacts” tab.
- Choose the desired contact to call from the list.
- Choose the number and then press the
 switch on the steering
wheel or select .
.
When the contact is empty
You can transfer the phone numbers in a Bluetooth® phone to the system.
Operation methods differ between PBAP (Phone Book Access Profile) compatible and PBAP incompatible Bluetooth® phones. If the cellular phone does not support either PBAP or OPP (Object Push Profile) service, you cannot transfer contacts.
- Press the switch on the
steering wheel.If the phonebook is empty, a message will be displayed.
- For a PBAP compatible Bluetooth® phone and “Automatic Transfer” is off
- Select the desired item.

- Select to transfer new contacts from a cellular phone, select “Always” and then enable “Automatic Transfer”.
- Select to transfer all the contacts from a connected cellular phone only once.
- Select to cancel transferring.
- For a PBAP incompatible but OPP compatible Bluetooth® phone
- Select the desired item.
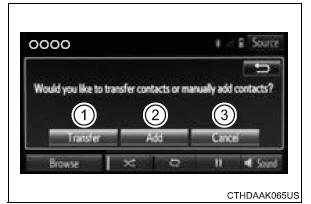
- Select to transfer the contacts from the connected cellular phone.
Follow the steps in “Update contacts from phone” from step 2.
- Select to add a new contact manually.
- Follow the steps in “Registering a new contact to the contacts list” from step 2. Select to cancel transferring.
Calling using favorites list
You can make a call using numbers registered in the contact.
- Display the phone screen.
- Select “Favorites” tab.
- Select the desired number to make a call.
Dialing from call history
You can make a call using the call history, which has the 3 functions below.
 : calls which you missed
 : calls which you received
 : calls which you made
- Display the phone screen.
- Select “Call History” tab.
- Select
 or the desired entry
from the list.
- When
 is selected
- Check that the “Call” screen is displayed.
- When the desired contact is selected
- Select the desired number.
- Check that the “Call” screen is displayed.
Call history list
- If you make a call to or receive a call from a number registered in the contact, the name is displayed in the call history.
- If you make multiple calls to the same number, only the last call made is displayed in the call history.
International calls
You may not be able to make international calls, depending on the mobile phone in use.
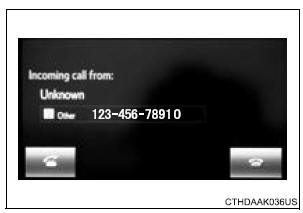
Receiving a call
When a call is received, the following screen is displayed together with a sound.
To answer the phone
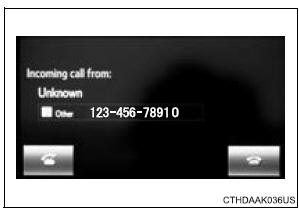
Press the  switch on the steering
wheel or select  .
.
To refuse a call
Press the  switch on the steering
wheel or select 
To adjust the incoming call volume
Turn the “PWR•VOL” knob. You can also adjust the volume using the steering switches.
International calls
Received international calls may not be displayed correctly depending on the cellular phone in use.
Speaking on the phone
The following screen is displayed when speaking on the phone.
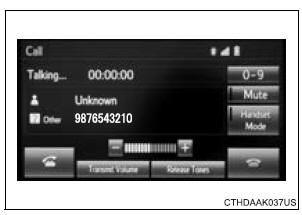
To adjust the call volume
Select “-” or “+”. You can also adjust the volume using the steering switches or the volume knob.
To prevent the other party from hearing your voice
Select “Mute”.
Inputting tones
When using phone services such as an answering service or a bank, you can store phone numbers and code numbers in the contact.
- Select “0-9”.
- Input the number.
Release Tones
“Release Tones” appear when a continuous tone signal(s) containing a (w) is registered in the contact list.
- Select “Release Tones
Release Tones
- A continuous tone signal is a character string that consists of numbers and the characters p or w. (e.g.056133w0123p#1)
- When the “p” pause tone is used, the tone data up until the next pause tone will be automatically sent after 2 seconds have elapsed. When the “w” pause tone is used, the tone data up until the next pause tone will be automatically sent after a user operation is performed.
- Release tones can be used when automated operation of a phone based service such as an answering machine or bank phone service is desired. A phone number with continuous tone signals can be registered in the contact list.
- Tone data after a “w” pause tone can be operated on voice command during a call
To transfer a call
Select “Handset Mode” to on from a hands-free call to a cellular phone call.
Select “Handset Mode” to off from a cellular phone call to a hands-free call.
Transmit volume setting
- Select “Transmit Volume”.
- Select the desired level for the transmit volume.
- Select “OK”.
To hang up
Press the  switch on the steering
wheel or select  .
.
Call waiting
When a call is interrupted by a third party while talking, an incoming call message will be displayed.
To talk with the other party:
- Press the
 switch on
the steering wheel. - Select
 .
.
To refuse the call: - Press the
 switch on
the steering wheel. - Select
 .
.
Every time you press the  switch
on the steering wheel or select during call waiting, you will be switched to the other party.
Transferring calls
- If you transfer from the cellular phone to hands-free, the hands-free screen will be displayed, and you can operate the system using the screen.
- Transfer method and operation may vary according to the cellular phone used.
- For operation of the cellular phone in use, see the phone’s manual.
Call waiting operation
Call waiting operation may differ depending on your phone company and cellular phone.
Bluetooth® phone message function
Received messages can be forwarded from the connected Bluetooth® phone, enabling checking and replying using the audio system.
Depending on the type of Bluetooth® phone connected, received messages may not be transferred to the message inbox.
If the phone does not support the message function, this function cannot be used.
Displaying message inbox screen
- Press
 button.
 - Select
 .
.
Receiving a message
When an e-mail/SMS/MMS is received, the incoming message screen pops up with sound and is ready to be operated on the screen.
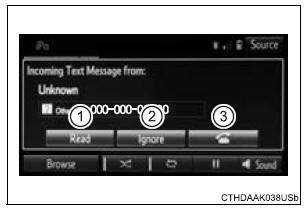
- Select to check the message.
- Select to refuse the message.
- Select to call the message sender.
Receiving a message
- Depending on the cellular phone used for receiving messages, or its registration status with the audio system, some information may not be displayed.
- The pop up screen is separately available for incoming e-mail and SMS/ MMS messages under the following conditions:
E-mail:
- “Incoming E-mail Display” is set to “Full Screen”.
- “E-mail Notification Popup” is set to on.
SMS/MMS:
- “Incoming SMS/MMS Display” is set to “Full screen”.
- “SMS/MMS Notification Popup” is set to on.
Checking the messages
- Display the message inbox screen.
- Select the desired message from the list.
- Check that the message is displayed.

- E-mails: Select “Mark Unread” or “Mark Read” to mark mail unread or read on the message inbox screen.
This function is available when “Update Read Status on Phone” is set to on
- Select to make a call to the sender.
- Select to have messages read out. To cancel this function, select “Stop”.
- Select to display the previous or next message.
- Select to reply the message.
Check the messages
- Depending on the type of Bluetooth® phone being connected, it may be necessary to perform additional steps on the phone.
- Messages are displayed in the appropriate connected Bluetooth® phone’s registered mail address folder.
Select the tab of the desired folder to be displayed.
- Only received messages on the connected Bluetooth® phone can be displayed.
- The text of the message is not displayed while driving.
- When “Automatic Message Readout” is set to on, messages will be automatically read out.
- Turn the “PWR•VOL” knob, or use the volume switch on the steering wheel to adjust the message read out volume.
- The message read out function is available even while driving.
Replying to a message
- Display the message inbox screen.
- Select the desired message from the list.
- Select “Quick Message”.
- Select the desired message.
- Select “Send”.
If an error message is displayed, follow the guidance on the screen to try again.
Editing quick reply message
- Select “Quick Message”.
- Select
 corresponding to the
desired message to edit. - Select “OK” when editing is completed.
Calling the message sender
Calls can be made to an e-mail/SMS/MMS message sender’s phone number.
- Display the message inbox screen.
- Select the desired message.
- Select
 .
. - Check that the “Call” screen is displayed.
Calling from a number within a message Calls can be made to a number identified in a message’s text area.
This operation cannot be performed while driving.
- Display the Message Inbox screen.
- Select the desired message.
- Select the text area.
- Select
 corresponding to the
desired number. - Check that the “Call” screen is displayed.
Calling from the incoming message screen
Using the steering wheel switches
The steering wheel switches can be used to operate a connected cellular phone.
Operating a telephone using the steering wheel switches
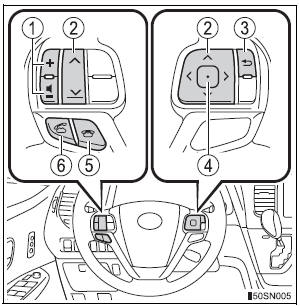
- Volume switch
- Increase/Decrease the volume
- Press and hold: Continuously increase/ decrease the volume
- Cursor switch
- Select a list/tab
- Back switch
- Return to the previous screen
- Enter switch
- Select an item
- On hook switch
- End a call
- Refuse a call
- Off hook switch
- Make a call
- Receive a call
- Display “Phone” screen
Bluetooth® phone settings
You can adjust the hands-free system to your desired settings.
“Phone/Message Settings” screen
To display the screen shown below, press the “SETUP” button, and select “Phone” on the “Setup” screen.
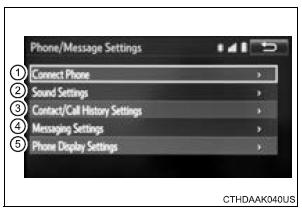
- Set the phone connection
- Setting the sound
- Contact/Call History Settings
- Set the message settings
- Set the phone display
Sound setting
- Display the “Phone/Message Settings” screen.
- Select “Sound Settings” on the “Phone/Message Settings” screen.
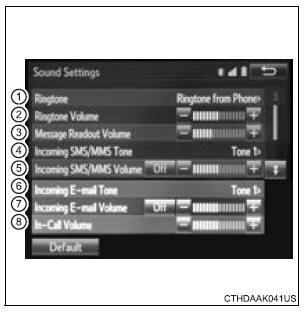
- Set the desired ringtone.
- Adjust the ringtone volume.
- Adjust the message readout volume.
- Set the desired incoming SMS/MMS tone.
- Adjust the incoming SMS/ MMS tone volume.
- Set the incoming e-mail tone.
- Adjust the incoming e-mail tone volume.
- Adjust the default volume of the other party’s voice.
To return to the default settings
Select “Default”, and then “Yes”.
Contact/Call History Settings
The contact can be transferred from a Bluetooth® phone to the system.
The contact also can be added, edited and deleted.
The call history can be deleted and contact and favorites can be changed.
“Contact/Call History Settings” screen
- Display the “Phone/Message Settings” screen.
- Select “Contact/Call History Settings”.
- Select the desired item to be set.
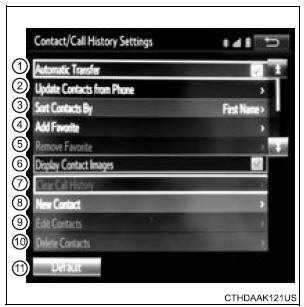
- For PBAP compatible Bluetooth® phones, select to set “Automatic Transfer” on/ off. When set to on, the phone’s contact data and history are automatically transferred.
- Select to update contacts from the connected phone.
- Select to sort contacts by the first name or last name field.
- Select to add contacts to the favorites list.
- Select to delete contacts from the favorites list.
- Select to display contact images.
- Select to clear contacts from the call history.*
- Select to add new contacts to the contact list.*
- Select to edit contacts in the contact list.*
- Select to delete contacts from the contact list.*
- Select to reset all setup items.
*: For PBAP compatible Bluetooth® phones only, this function is available when “Automatic Transfer” is set to off.
Update contacts from phone
Operation methods differ between PBAP compatible and PBAP incompatible but OPP compatible Bluetooth® phones.
If your cellular phone is neither PBAP nor OPP compatible, the contacts cannot be transferred.
For PBAP Compatible Bluetooth® Phones
- Select “Update Contacts from Phone”.
- Check that a confirmation screen is displayed when the operation is complete.
This operation may be unnecessary depending on the type of cellular phone.
Depending on the type of cellular phone, OBEX authentication may be required when transferring contact data. Enter “1234” into the Bluetooth® phone.
If another Bluetooth® device is connected when transferring contact data, depending on the phone, the connected Bluetooth® device may need to be disconnected.
Depending on the type of Bluetooth® phone being connected, it may be necessary to perform additional steps on the phone.
For PBAP Incompatible but OPP compatible Bluetooth® Phones
- Select “Update Contacts from Phone”.
- Transfer the contact data to the system using a Bluetooth® phone.
This operation may be unnecessary depending on the type of cellular phone.
Depending on the type of cellular phone, OBEX authentication may be required when transferring contact data. Enter “1234” into the Bluetooth® phone.
To cancel this function, select “Cancel”.
- Check that a confirmation screen is displayed when the operation is complete.
Updating the contacts in a different way (From the “Call History” screen)
For PBAP compatible Bluetooth® phones, this function is available when “Automatic Transfer” is set to off.
- Display the phone screen.
- Select the “Call History” tab and select a contact not yet registered in the contact list.
- Select “Update Contact”.
- Select the desired contact.
- Select a phone type for the phone number.
Registering a new contact to the contact list
New contact data can be registered. Up to 4 numbers per person can be registered. For PBAP compatible Bluetooth® phones, this function is available when “Automatic Transfer” is set to off.
- Select “New Contact”.
- Enter the name and select “OK”.
- Enter the phone number and select “OK”.
- Select the phone type for the phone number.
- To add another number to this contact, select “Yes”.
Registering a new contact in a different way (From the “Call History” screen)
- Display the phone screen.
- Select the “Call History” tab and select a contact not yet registered in the contact list.
- Select “Add to Contacts”.
- Follow the steps in “Registering a new contact to the contacts list” from step 3.
Editing the contact data
For PBAP compatible Bluetooth® phones, this function is available when “Automatic Transfer” is set to off.
- Select “Edit Contact”.
- Select the desired contact.
- Select
 corresponding to the
desired name or number.
- For editing the name
- Follow the steps in “Registering a new contact to the contacts list” from step 2.
- For editing the number
- Follow the steps in “Registering a new contact to the contacts list” from step 3.
Editing the contacts in a different way (From the “Contact Details” screen)
- Display the phone screen.
- Select the “Contacts”, “Call History” tab or the “Favorites” tab and select the desired contact.
- Select “Edit Contact”.
“E-mail Addresses”: Select to display all registered e-mail addresses for the contact.
- Follow the steps in “Editing the contact data” from step 4.
Deleting the contact data
For PBAP compatible Bluetooth® phones, this function is available when “Automatic Transfer” is set to off.
- Select “Delete Contacts”.
- Select the desired contact and select “Delete”.
- Select “Yes” when the confirmation screen appears.
Deleting the contact in a different way (From the “Contact Details” screen)
- Display the phone screen.
- Select the “Contacts”, “Call history” tab or the “Favorites” tab and select the desired contact.
- Select “Edit Contact”.
- Select “Yes” when the confirmation screen appears.
Favorites list setting
Up to 15 contacts (maximum of 4 numbers per contact) can be registered in the favorites list.
Registering the contacts in the favorites list
- Select “Add Favorite”.
- Select the desired contact to add to the favorites list.
Dimmed contacts are already stored as a favorite.
- Check that a confirmation screen is displayed when the operation is complete
- When 15 contacts have already been registered to the favorites list
- When 15 contacts have already been registered to the favorites list, a registered contact needs to be replaced.
Select “Yes” when the confirmation screen appears to replace a contact.
- Select the contact to be replaced.
- Check that a confirmation screen is displayed when the operation is complete.
- Registering contacts in the favorites list in a different way (from the “Contacts” screen)
- Display the phone screen.
- Select the “Contacts” tab.
- Select
 at the beginning of
the desired contact list name to be registered in the favorites list.When selected,
 is changed to
 , and the contact is registered
in the favorites list.
- Registering contacts in the favorites list in a different way (from the “Contact Details” screen)
- Display the phone screen.
- Select the “Contacts” tab or the “Call History” tab and select the desired contact.
- Select “Add Favorite”.
- Check that a confirmation screen is displayed when the operation is complete.
Deleting the contacts in the favorites list
- Select “Remove Favorite”.
- Select the desired contacts and select “Remove”.
- Select “Yes” when the confirmation screen appears.
- Check that a confirmation screen is displayed when the operation is complete.
- Deleting contacts in the favorites list in a different way (from the “Contacts” screen)
- Display the phone screen.
- Select the “Contacts” tab.
- Select
 at the beginning of
the contact list name to be deleted from the favorites list.When selected,
 is changed to
 , and the data is deleted from
the list.
- Deleting contacts in the favorites list in a different way (from the “Contact Details” screen)
- Display the phone screen.
- Select the “Contacts”, “Call History” tab or the “Favorites” tab and select the desired contact to delete.
- Select “Remove Favorite”.
- Select “Yes” when the confirmation screen appears.
- Check that a confirmation screen is displayed when the operation is complete.
Message Settings
- Display the “Phone/Message Settings” screen.
- Select “Messaging Settings”.
- Select the desired item to be set.
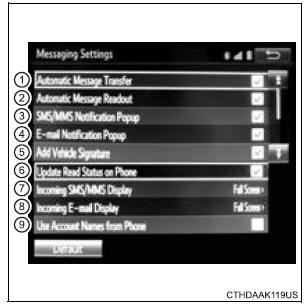
- Set automatic message transfer on/off.
- Set automatic message readout on/off.
- Set the SMS/MMS notification popup on/off.
- Set the e-mail notification popup on/off.
- Set adding the vehicle signature to outgoing messages on/off.
- Set updating message read status on phone on/off.
- Change the incoming SMS/MMS display.
“Full Screen”: When an SMS/MMS message is received, the incoming SMS/MMS display screen is displayed and can be operated on the screen.
“Drop-Down”: When an SMS/MMS message is received, a message is displayed on the upper side of the screen.
- Change the incoming e-mail display.
“Full Screen”: When an e-mail is received, the incoming e-mail display screen is the displayed and can be operated on the screen.
“Drop-Down”: When an e-mail is received, a message is displayed on the upper side of the screen.
- Set display of messaging account names on the inbox tab on/off.
When set to on, messaging account names used on the cellular phone will be displayed.
To return to the default settings
Select “Default”, and then “Yes”.
Displaying the “Messaging Settings” screen in a different way
- Display the phone screen.
- Select
 .
. - Select “Settings”.
Phone Display Settings
- Display the “Phone/Message Settings” screen.
- Select “Phone Display Settings”.
- Select the desired item to be set.
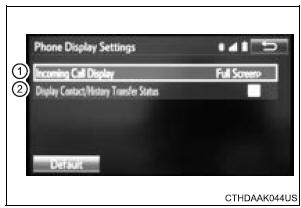
- Change the incoming call display.
“Full Screen”: When a call is received, the hands-free screen is displayed and can be operated on the screen.
“Drop-Down”: A message is displayed on the upper side of the screen.
- Set display of the contact/ history transfer completion message on/off.
To return to the default settings
Select “Default”, and then “Yes”.
What to do if... (Troubleshooting)
If there is a problem with the hands-free system or a Bluetooth® device, first check the table below.
- When using the hands-free system with a Bluetooth® device
|
The hands-free system or Bluetooth® device does not work. |
The connected device may not be a compatible Bluetooth® cellular phone.
|
The Bluetooth version of the connected cellular phone may be older than the specified version.
|
- When registering/connecting a cellular phone
| A cellular phone cannot be registered |
An incorrect passcode was entered on the cellular phone.
|
The registration operation has not been completed on the cellular phone side.
|
Old registration information remains on either this system or the cellular phone.
|
| A Bluetooth® connection cannot be made |
Another Bluetooth® device is already connected.
|
Bluetooth® function is not enabled on the cellular phone.
|
| “Please check your device settings.” message is displayed. |
Bluetooth® function is not enabled on the cellular phone.
|
Old registration information remains on either this system or the cellular phone.
|
- When making/receiving a call
| A call cannot be made/received |
Your vehicle is in a “Out of cellular service area. Please try again later.” area.
|
- When using the phonebook
| Phonebook data cannot be transferred manually/automatically. |
The profile version of the connected cellular phone may not be compatible with transferring phonebook data.
|
Automatic phonebook transfer function on this system is set to off.
|
Passcode has not been entered on the cellular phone.
|
Transfer operation on the cellular phone has not completed.
|
| Phonebook data cannot be edited. |
Automatic phonebook transfer function on this system is set to on.
|
- When using the Bluetooth® message function
| Messages cannot be viewed. |
Message transfer is not enabled on the cellular phone.
|
Automatic transfer function on this system is set to off.
|
| New message notifications are not displayed |
Notification of SMS/MMS/E-mail reception on this system is set to off.
|
Automatic message transfer function is not enabled on the cellular phone.
|
- In other situations
| Even though all conceivable measures have been taken, the symptom status does not change. |
The cellular phone is not close enough to this system.
|
The cellular phone is the most likely cause of the symptom.
|
Download Manual