For safe use
Before driving
Floor mat
Use only floor mats designed specifically for vehicles of the same model and model year as your vehicle. Fix them securely in place onto the carpet.
- Insert the retaining hooks (clips) into the floor mat eyelets.
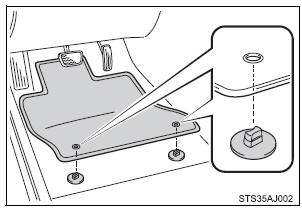
- Turn the upper knob of each retaining hook (clip) to secure the floor mats in place.
*: Always align the  marks.

The shape of the retaining hooks (clips) may differ from that shown in the illustration.
| WARNING
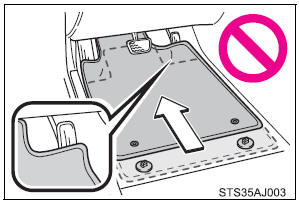
Observe the following precautions. Failure to do so may cause the driver’s floor mat to slip, possibly interfering with the pedals while driving. An unexpectedly high speed may result or it may become difficult to stop the vehicle. This could lead to an accident, resulting in death or serious injury. When installing the driver’s floor mat
Before driving
|
For safety drive
| For safe driving, adjust the seat and mirror to an appropriate position before driving. |
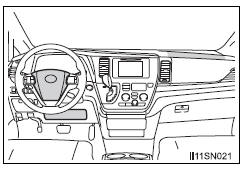
Correct driving posture
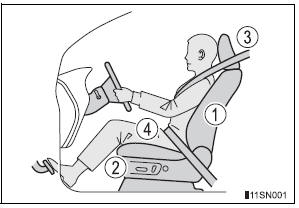
- Adjust the angle of the seatback so that you are sitting straight up and so that you do not have to lean forward to steer.
- Adjust the seat so that you can depress the pedals fully and so that your arms bend slightly at the elbow when gripping the steering wheel.
- Lock the head restraint in place with the center of the head restraint closest to the top of your ears.
- Wear the seat belt correctly.
Correct use of the seat belts
Make sure that all occupants are wearing their seat belts before driving the vehicle. Use a child restraint system appropriate for the child until the child becomes large enough to properly wear the vehicle’s seat belt.
Adjusting the mirrors
Make sure that you can see backward clearly by adjusting the inside and outside rear view mirrors properly.
| WARNING
Observe the following precautions. Failure to do so may result in death or serious injury.
|
Seat belts
Make sure that all occupants are wearing their seat belts before driving the vehicle.
Correct use of the seat belts
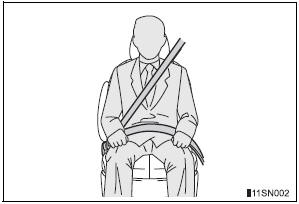
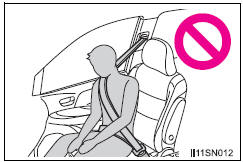
- Extend the shoulder belt so that it comes fully over the shoulder, but does not come into contact with the neck or slide off the shoulder.
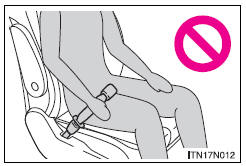
- Position the lap belt as low as possible over the hips.
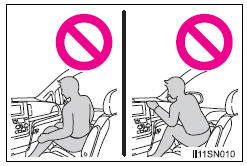
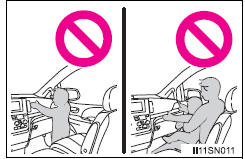
- Adjust the position of the seatback.
Sit up straight and well back in the seat.
- Do not twist the seat belt.
Fastening and releasing the seat belt (except for the third center seat)
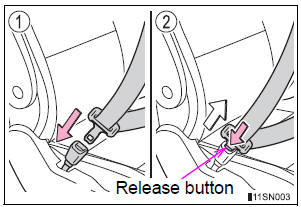
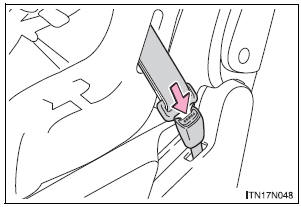
- To fasten the seat belt, push the plate into the buckle until a click sound is heard.
- To release the seat belt, press the release button.
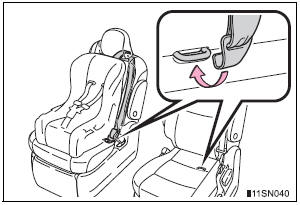
Fastening the seat belt (for the third center seat)
- Take the plate out of the holder, and then pull down the seat belt.
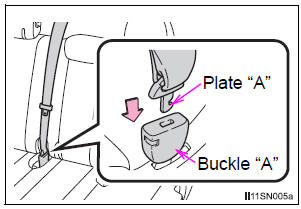
- Push plate “A” into buckle “A” until a click sound is heard.
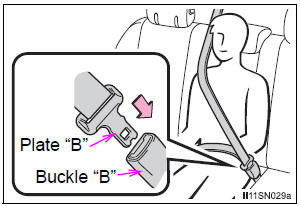
- Push plate “B” into buckle “B” until a click sound is heard.
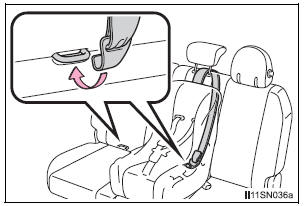
Releasing and stowing the seat belt (for the third center seat)
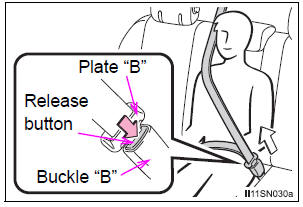
- To release plate “B”, press the release button on buckle “B”.

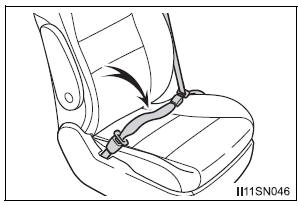
- To release plate “A”, insert the key or plate “B” into the hole on buckle “A”.
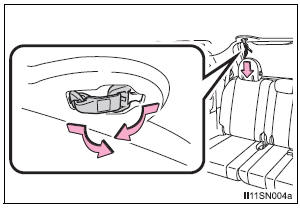
Retract the belt slowly when releasing and stowing the seat belt.

- Insert the seat belt plates into the holder on the roof as shown.
Adjusting the seat belt shoulder anchor height (front and second outside Tip-up seats)
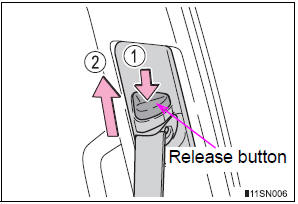
- Push the seat belt shoulder anchor down while pressing the release button.
- Push the seat belt shoulder anchor up.
Move the height adjuster up and down as needed until you hear a click.
Seat belt pretensioners (front seats)

The pretensioners help the seat belt to quickly restrain the occupant by retracting the seat belt when the vehicle is subjected to certain types of severe frontal or side collision or a vehicle rollover.
The pretensioners do not activate in the event of a minor frontal impact, a side impact or a rear impact.
Pre-collision seat belts (front seats of vehicles with pre-collision system)
If the system determines that a collision is unavoidable, the front seat belts will retract before the collision.
- Emergency locking retractor (ELR) The retractor will lock the belt during a sudden stop or on impact. It may also lock if you lean forward too quickly. A slow, easy motion will allow the belt to extend so that you can move around fully.
- Automatic locking retractor (ALR) When a passenger’s shoulder belt is completely extended and then retracted even slightly, the belt is locked in that position and cannot be extended. This feature is used to hold the child restraint system (CRS) firmly. To free the belt again, fully retract the belt and then pull the belt out once more.
- Child seat belt usage The seat belts of your vehicle were principally designed for persons of adult size.
- Use a child restraint system appropriate for the child, until the child
becomes large enough to properly wear the vehicle’s seat belt. - When the child becomes large enough to properly wear the vehicle’s seat belt, follow the instructions regarding seat belt usage.
- Replacing the belt after the pretensioner has been activated If the vehicle is involved in multiple collisions, the pretensioner will activate for the first collision, but will not activate for the second or subsequent collisions.
- Seat belt extender
If your seat belts cannot be fastened securely because they are not long enough, a personalized seat belt extender is available from your Toyota dealer free of charge.
| WARNING
Observe the following precautions to reduce the risk of injury in the event of sudden braking, sudden swerving or an accident. Failing to do so may cause death or severe injury. Wearing a seat belt
Pregnant women
Obtain medical advice and wear the seat belt in the proper way. Women who are pregnant should position the lap belt as low as possible over the hips in the same manner as other occupants, extending the shoulder belt completely over the shoulder and avoiding belt contact with the rounding of the abdominal area. If the seat belt is not worn properly, not only a pregnant woman, but also the fetus could suffer death or serious injury as a result of sudden braking or a collision. People suffering illness Obtain medical advice and wear the seat belt in the proper way. |

| WARNING
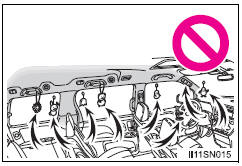
When children are in the vehicle Do not allow children to play with the seat belt. If the seat belt becomes twisted around a child’s neck, it may lead to choking or other serious injuries that could result in death. If this occurs and the buckle cannot be unfastened, scissors should be used to cut the belt. Seat belt pretensioners (front seats)
Adjustable shoulder anchor (front and second outside Tip-up seats) Always make sure the shoulder belt is positioned across the center of your shoulder. The belt should be kept away from your neck, but not falling off your shoulder. Failure to do so could reduce the amount of protection in an accident and cause death or serious injuries in the event of a sudden stop, sudden swerve or accident. Seat belt damage and wear
Using a seat belt extender
When using the third center seat belt
Do not use the third center seat belt with either buckle released. Fastening only one of the buckles may result in death or serious injury in case of sudden braking, sudden swerving or an accident. |

| NOTICE
When using a seat belt extender When releasing the seat belt, press on the buckle release button on the extender, not on the seat belt. This helps prevent damage to the vehicle interior and the extender itself. |
SRS airbags
The SRS airbags inflate when the vehicle is subjected to certain types of severe impacts that may cause significant injury to the occupants. They work together with the seat belts to help reduce the risk of death or serious injury.
- SRS front airbags
- SRS driver airbag/front passenger airbag Can help protect the head and chest of the driver and front passenger from impact with interior components
- SRS driver’s knee airbag Can help provide driver protection
- SRS front passenger’s seat cushion airbag Can help restrain the front passenger
- SRS side and curtain shield airbags
- SRS side airbags Can help protect the torsos of the front seat occupants
- SRS curtain shield airbags
- Can help protect primarily the heads of occupants in the outer seats
- Can prevent the occupants from being thrown from the vehicle in the event of vehicle rollover
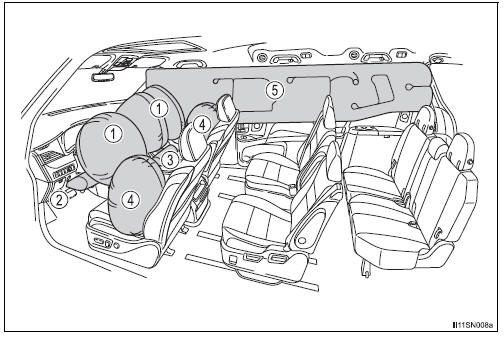
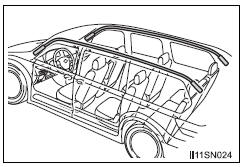
SRS airbag system components
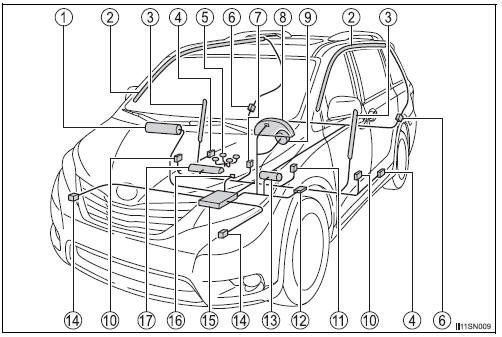
- Front passenger airbag
- Curtain shield airbags
- Side airbags
- Seat belt pretensioners and force limiters
- Front passenger occupant classification system (ECU and sensors)
- Side impact sensors (rear)
- Front passenger’s seat belt buckle switch
- SRS warning light
- Driver airbag
- Side impact sensors (front door)
- Driver’s seat belt buckle switch
- Driver’s seat position sensor
- Driver’s knee airbag
- Front impact sensors
- Airbag sensor assembly
- “AIR BAG ON” and “AIR BAG OFF” indicator lights
- Front passenger’s seat cushion airbag
Your vehicle is equipped with ADVANCED AIRBAGS designed based on the US motor vehicle safety standards (FMVSS208). The airbag sensor assembly (ECU) controls airbag deployment based on information obtained from the sensors etc. shown in the system components diagram above. This information includes crash severity and occupant information. As the airbags deploy, a chemical reaction in the inflators quickly fills the airbags with non-toxic gas to help restrain the motion of the occupants.
| WARNING
SRS airbag precautions Observe the following precautions regarding the SRS airbags. Failure to do so may cause death or serious injury.
SRS airbag precautions
SRS airbag precautions
SRS airbag precautions
SRS airbag precautions
Modification and disposal of SRS airbag system components
|
If the SRS airbags deploy (inflate)
- Slight abrasions, burns, bruising etc., may be sustained from SRS airbags, due to the extremely high speed deployment (inflation) by hot gases.
- Bruising and slight abrasions may result from contact with a deploying (inflating) SRS airbag.
- A loud noise and white powder will be emitted.
- Parts of the airbag module (steering wheel hub, airbag cover and inflator) as well as the front seats, parts of the front and rear pillars, and roof side rail, may be hot for several minutes. The airbag itself may also be hot.
- The windshield may crack.
- For Safety Connect subscribers, if the SRS airbags deploy or in the event of a severe rear-end collision, the system is designed to send an emergency call to the response center, notifying them of the vehicle’s location (without needing to push the “SOS” button) and an agent will attempt to speak with the occupants to ascertain the level of emergency and assistance required.
If the occupants are unable to communicate, the agent automatically treats the call as an emergency and helps to dispatch the necessary emergency services.
SRS airbag deployment conditions (SRS front airbags)
- The SRS front airbags will deploy in the event of an impact that exceeds the set threshold level (the level of force corresponding to an approximately 12 - 18 mph [20 - 30 km/h] frontal collision with a fixed wall that does not move or deform).
However, this threshold velocity will be considerably higher in the following situations:
- If the vehicle strikes an object, such as a parked vehicle or sign pole, which can move or deform on impact
- If the vehicle is involved in an underride collision, such as a collision in which the front of the vehicle “underrides”, or goes under, the bed of a truck
- Depending on the type of collision, it is possible that only the seat belt pretensioners will activate.
- The SRS front airbags for the front passenger will not activate if there is no passenger sitting in the front passenger seat. However, the SRS front airbags for the front passenger may deploy if luggage is put in the seat, even if the seat is unoccupied.
- The SRS seat cushion airbag on the front passenger’s seat will not operate if the occupant is not wearing a seat belt.
SRS airbag deployment conditions (SRS side and curtain shield airbags)
- The SRS side and curtain shield airbags will deploy in the event of an impact that exceeds the set threshold level (the level of force corresponding to the impact force produced by an approximately 3300 lb. [1500 kg] vehicle colliding with the vehicle cabin from a direction perpendicular to the vehicle orientation at an approximate speed of 12 - 18 mph [20 - 30 km/h]).
- The SRS curtain shield airbags will deploy in the event of vehicle rollover.
- The SRS side and curtain shield airbags may also deploy in the event of a severe frontal collision.
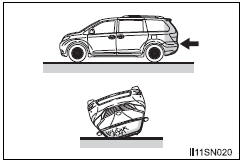
Conditions under which the SRS airbags may deploy (inflate), other than a collision
The SRS front airbags and SRS side and curtain shield airbags may also deploy if a serious impact occurs to the underside of your vehicle. Some examples are shown in the illustration.
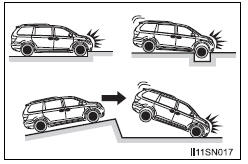
- Hitting a curb, edge of pavement or hard surface
- Falling into or jumping over a deep hole
- Landing hard or falling
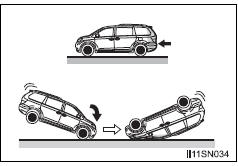
The SRS curtain shield airbags may also deploy under the situations shown in the illustration.
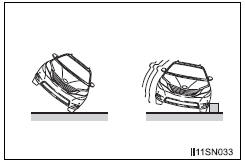
- The angle of vehicle tip-up is marginal.
- The vehicle skids and hits a curb stone.
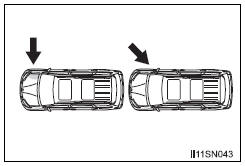
Types of collisions that may not deploy the SRS airbag (SRS front airbags)
The SRS front airbags do not generally inflate if the vehicle is involved in a side or rear collision, if it rolls over, or if it is involved in a low-speed frontal collision. But, whenever a collision of any type causes sufficient forward deceleration of the vehicle, deployment of the SRS front airbags may occur.
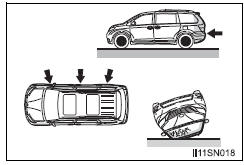
- Collision from the side
- Collision from the rear
- Vehicle rollover
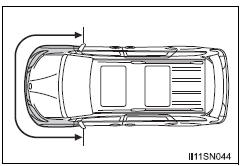
Types of collisions that may not deploy the SRS airbags (SRS side and curtain shield airbags)
The SRS side and curtain shield airbags may not activate if the vehicle is subjected to a collision from the side at certain angles, or a collision to the side of the vehicle body other than the passenger compartment.
- Collision from the side to the vehicle body other than the passenger compartment
- Collision from the side at an angle
The SRS side airbags do not generally inflate if the vehicle is involved in a rear collision, if it rolls over, or if it is involved in a low-speed side collision or low-speed frontal collision.
- Collision from the rear
- Vehicle rollover
The SRS curtain shield airbags do not generally inflate if the vehicle is involved in a rear collision, if it pitches end over end, or if it is involved in a low-speed side or low-speed frontal collision.
- Collision from the rear
- Pitching end over end
When to contact your Toyota dealer
In the following cases, the vehicle will require inspection and/or repair. Contact your Toyota dealer as soon as possible.
- Any of the SRS airbags have been inflated.
- The front of the vehicle is damaged or deformed, or was involved in an accident that was not severe enough to cause the SRS front airbags to inflate.
- A portion of a door or its surrounding area is damaged or deformed, or the vehicle was involved in an accident that was not severe enough to cause the SRS side and curtain shield airbags to inflate.
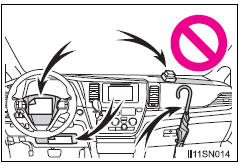
- The pad section of the steering wheel, dashboard near the front passenger airbag or lower portion of the instrument panel is scratched, cracked, or otherwise damaged.
- The front passenger’s seat cushion surface is scratched, cracked, or otherwise damaged.
- The surface of the seats with the side airbag is scratched, cracked or otherwise damaged.
- The portion of the front pillars, rear pillars or roof side rail garnishes (padding) containing the curtain shield airbags inside is scratched, cracked or otherwise damaged.
Front passenger occupant classification system
Your vehicle is equipped with a front passenger occupant classification system. This system detects the conditions of the front passenger seat and activates or deactivates the devices for the front passenger.
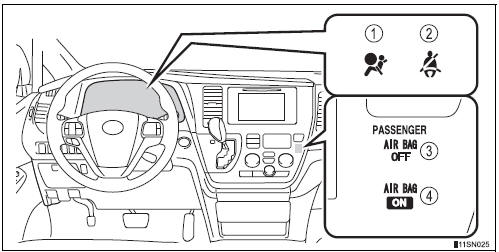
- SRS warning light
- Seat belt reminder light
- “AIR BAG OFF” indicator light
- “AIR BAG ON” indicator light
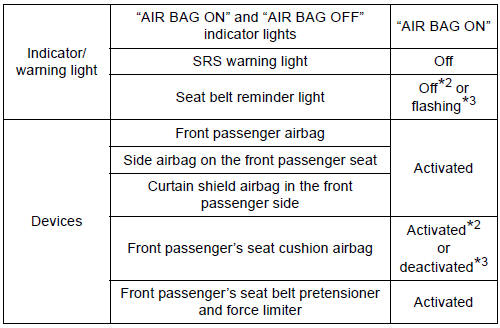
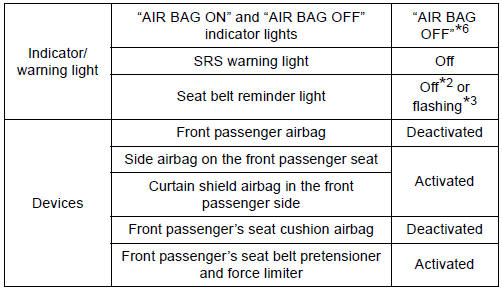
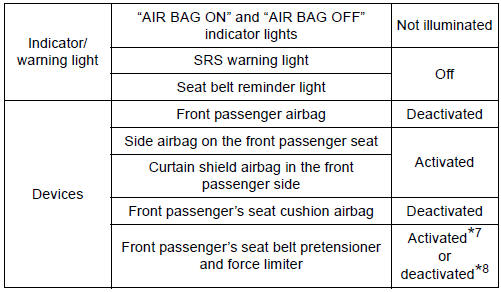
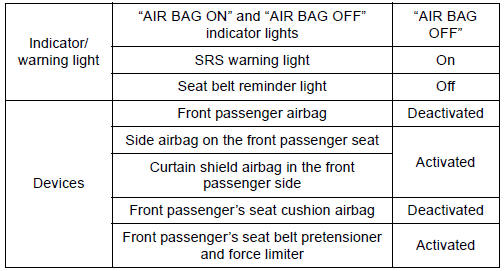
Condition and operation in the front passenger occupant classification system
- Adult*1
- Child*4 or child restraint system*5
- Unoccupied
- There is a malfunction in the system
*1: The system judges a person of adult size as an adult. When a smaller adult sits in the front passenger seat, the system may recognize him/her as a child depending on his/her physique and posture.
*2: In the event the front passenger is wearing a seat belt.
*3: In the event the front passenger does not wear a seat belt.
*4: When a larger child who has outgrown a child restraint system sits in the front passenger seat, the system may recognize him/her as an adult depending on his/her physique or posture.
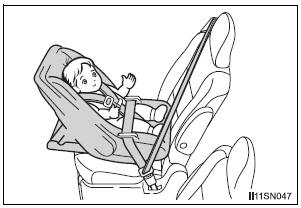
*5: Never install a rear-facing child restraint system on the front passenger seat. A forward-facing child restraint system should only be installed on the front passenger seat when it is unavoidable. *6: In case the indicator light is not illuminated, consult this manual on how to install the child restraint system properly. *7: In the event of a side collision.
*8: In the event of a frontal collision or rollover.
| WARNING
Front passenger occupant classification system precautions Observe the following precautions regarding the front passenger occupant classification system. Failure to do so may cause death or serious injury.
Front passenger occupant classification system precautions
|
Safety information for children
Observe the following precautions when children are in the vehicle.
Use a child restraint system appropriate for the child, until the child becomes large enough to properly wear the vehicle’s seat belt.
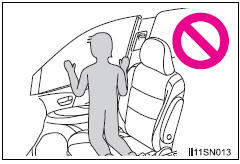
- It is recommended that children sit in the rear seats to avoid accidental contact with the shift lever, wiper switch etc.
- Use the sliding door child-protector lock or the window lock switch to avoid children opening the door while driving or operating the power window accidentally.
- Do not let small children operate equipment which may catch or pinch body parts, such as the power window, hood, back door, seats etc.
| WARNING Never leave children unattended in the vehicle, and never allow children to have or use the key.
Children may be able to start the vehicle or shift the vehicle into neutral. There is also a danger that children may injure themselves by playing with the windows, the moon roof (if equipped) or other features of the vehicle. In addition, heat build-up or extremely cold temperatures inside the vehicle can be fatal to children. |
Child restraint systems
A child restraint system for a small child or baby must itself be properly restrained on the seat with the LATCH anchors or the lap portion of the lap/shoulder belt.
The laws of all 50 states of U.S.A. and Canada now require the use of child restraint systems.
Points to remember
Studies have shown that installing a child restraint system on a rear seat is much safer than installing one on the front passenger seat.
- Choose a child restraint system that suits your vehicle and is appropriate to the age and size of the child.
- For installation details, follow the instructions provided with the child restraint system.
General installation instructions are provided in this manual.
Types of child restraints
Child restraint systems are classified into the following 3 types according to the age and size of the child:
- Rear facing - Infant seat/convertible seat
- Forward facing - Convertible seat

- Booster seat

Selecting an appropriate child restraint system
- Use a child restraint system appropriate for the child until the child becomes large enough to properly wear the vehicle’s seat belt.
- If the child is too large for a child restraint system, sit the child on a rear seat and use the vehicle’s seat belt.
| WARNING
Child restraint precautions
Child restraint precautions
When children are in the vehicle Do not allow children to play with the seat belt. If the seat belt becomes twisted around a child’s neck, it may lead to choking or other serious injuries that could result in death. If this occurs and the buckle cannot be unfastened, scissors should be used to cut the belt. When the child restraint system is not in use
|
Installing child restraints
| Follow the child restraint system manufacturer’s instructions.
Firmly secure child restraints to the rear seats using the LATCH anchors or a seat belt. Attach the top tether strap when installing a child restraint. The lap/shoulder belt can be used if your child restraint system is not compatible with the LATCH (Lower Anchors and Tethers for Children) system. |
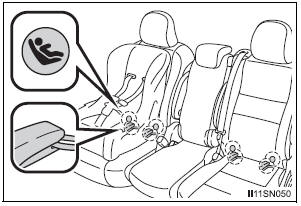
Child restraint LATCH anchors
- Second seats (8-passenger models)
LATCH anchors are provided for second outside seats. (Buttons displaying the location of the anchors are attached to the seats.)
- Second seats (7-passenger models)
LATCH anchors are provided for both second seats. (Buttons displaying the location of the anchors are attached to the seats.)
- Third seats
LATCH anchors are provided for the right outboard seat and center seat. (Buttons displaying the location of the anchors are attached to the seats.)
Seat belts equipped with a child restraint locking mechanism (ALR/ELR belts except driver’s seat belt)
Anchor brackets (for top tether strap)
- Second seats (8-passenger models)
Anchor brackets are provided for second outside seats.
- Second seats (7-passenger models)
Anchor brackets are provided for both second seats.
- Third seats
An anchor brackets are provided for the right outboard seat and center seat.
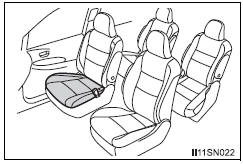
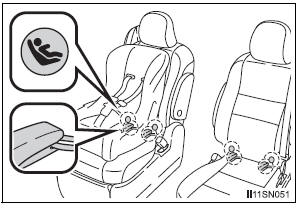
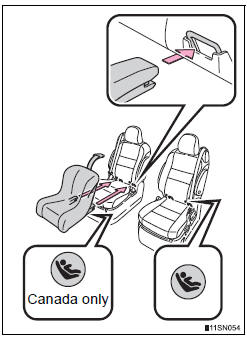
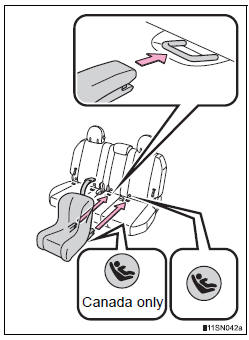
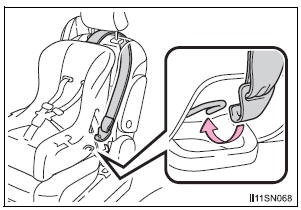
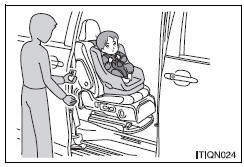
Installation with LATCH system (second seat)
- Fold the seatback while pulling the lever and move to the rearmost recline position.
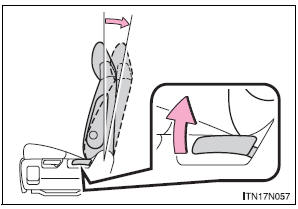
- Widen the gap between the seat cushion and seatback slightly.
- Type A
- Latch the hooks of the lower straps onto the LATCH anchors. If the child restraint has a top tether strap, the top tether strap should be latched onto the top tether strap anchor.
For owners in Canada: The symbol on a child restraint system indicates the presence of a lower connector system.
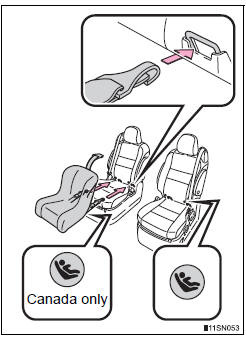
- Type B
- Latch the buckles onto the LATCH anchors. If the child restraint has a top tether strap, the top tether strap should be latched onto the top tether strap anchor.
For owners in Canada: The symbol on a child restraint system indicates the presence of a lower connector system.
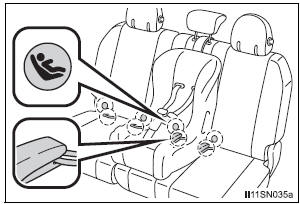
Installation with LATCH system (third seat)
- Manual seat
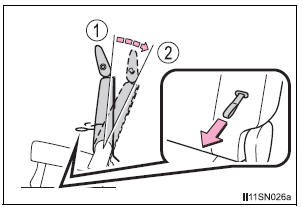
- Fold the seatback while pulling the strap. Return the seatback and secure it at the 1st lock position (most upright position).
Adjust the seatback to the 11th lock position.
- 1st lock position
- 11th lock position
- Power seat
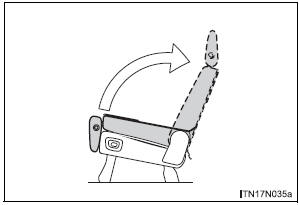
- Fold down the seatback by pressing the folding/returning switch . Raise the seatback by pressing the same switch, the returning switch or the seatback angle adjustment switch .
(The seatback will automatically stop.) Do not touch the switch while the seatback is moving, because the operation will stop.
- Widen the gap between the seat cushion and seatback slightly.
- Type A
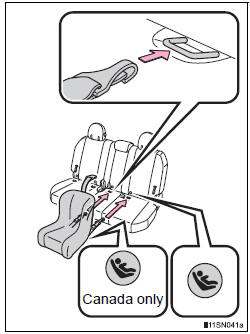
- Latch the hooks of the lower straps onto the LATCH anchors. If the child restraint has a top tether strap, the top tether strap should be latched onto the top tether strap anchor.
For owners in Canada: The symbol on a child restraint system indicates the presence of a lower connector system.
- Type B
- Latch the buckles onto the LATCH anchors. If the child restraint has a top tether strap, the top tether strap should be latched onto the top tether strap anchor.
For owners in Canada: The symbol on a child restraint system indicates the presence of a lower connector system.
Installing child restraints using a seat belt (child restraint lock function belt)
Rear facing - Infant seat/convertible seat
- Place the child restraint system on the rear seat facing the rear of the vehicle.
- Run the seat belt through the child restraint system and insert the plate into the buckle. Make sure that the belt is not twisted.
- Fully extend the shoulder belt and allow it to retract to put it in lock mode. In lock mode, the belt cannot be extended.
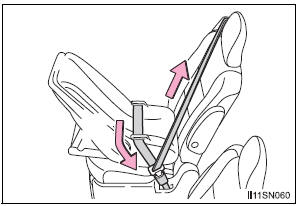
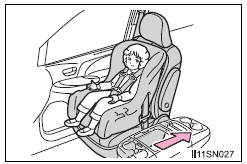
- While pushing the child restraint system down into the rear seat, allow the shoulder belt to retract until the child restraint system is securely in place.
After the shoulder belt has retracted to a point where there is no slack in the belt, pull the belt to check that it cannot be extended.
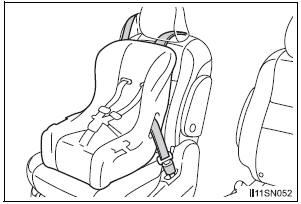
Forward facing - Convertible seat
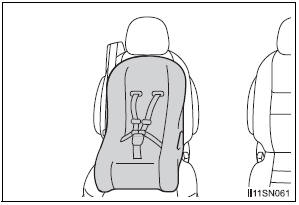
- Place the child restraint system on the seat facing the front of the vehicle.
- Run the seat belt through the child restraint system and insert the plate into the buckle. Make sure that the belt is not twisted.
- Fully extend the shoulder belt and allow it to retract to put it in lock mode. In lock mode, the belt cannot be extended.
- While pushing the child restraint system into the rear seat, allow the shoulder belt to retract until the child restraint system is securely in place.
After the shoulder belt has retracted to a point where there is no slack in the belt, pull the belt to check that it cannot be extended.
- If the child restraint has a top tether strap, the top tether strap should be latched onto the top tether strap anchor.
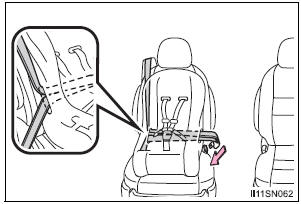
Booster seat

- Place the child restraint system on the seat facing the front of the vehicle.
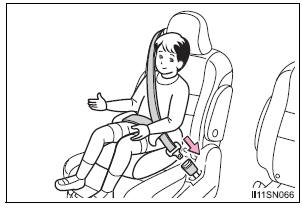
- Sit the child in the child restraint system. Fit the seat belt to the child restraint system according to the manufacturer’s instructions and insert the plate into the buckle. Make sure that the belt is not twisted.
Check that the shoulder belt is correctly positioned over the child’s shoulder and that the lap belt is as low as possible.
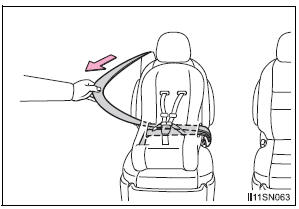
Removing a child restraint installed with a seat belt
Push the buckle release button and fully retract the seat belt.
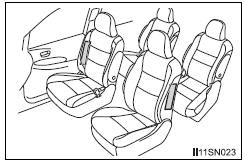
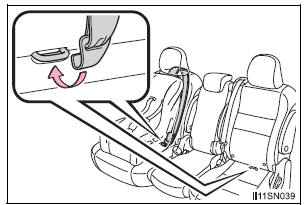
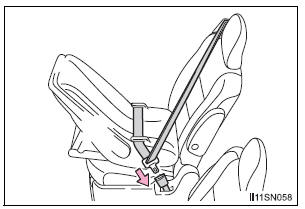
Child restraint systems with a top tether strap (second seat)

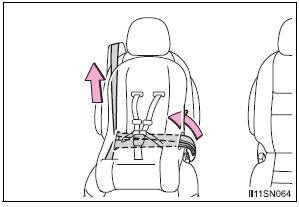
- Secure the child restraint system using the seat belt or LATCH anchors, and adjust the head restraint to the uppermost position.
*: Ottoman seat only
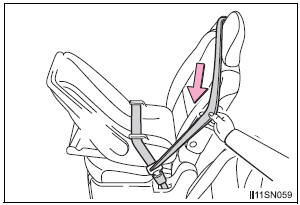
- Latch the hook onto the anchor bracket and tighten the top tether strap.
Make sure the top tether strap is securely latched.

- Adjust the head restraint to the downmost lock position.
Child restraint systems with a top tether strap (third seat)
Center seat
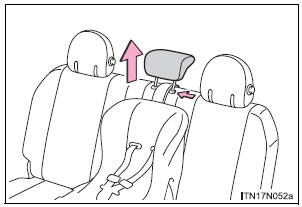
- Secure the child restraint system using the seat belt or LATCH anchors. Adjust the head restraint to the uppermost position.

- Latch the hook onto the anchor bracket and tighten the top tether strap.
Make sure the top tether strap is securely latched.
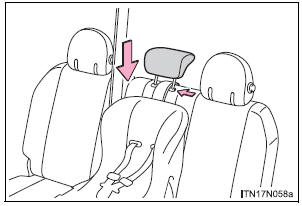
- Adjust the head restraint to the downmost position.
Right outboard seat
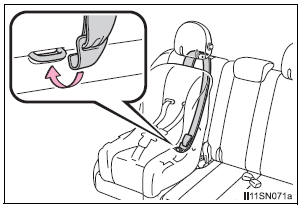
Latch the hook onto the anchor bracket and tighten the top tether strap.
Make sure the top tether strap is securely latched.
Pull the head restraint up to use.
Laws and regulations pertaining to anchorages
The LATCH system conforms to FMVSS225 or CMVSS210.2.
Child restraint systems conforming to FMVSS213 or CMVSS213 specifications can be used.
This vehicle is designed to conform to the SAE J1819.
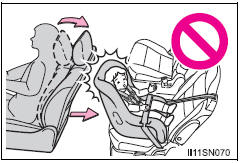
| WARNING
When installing a booster seat To prevent the belt from going into ALR lock mode, do not fully extend the shoulder belt. ALR mode causes the belt to tighten only. This could cause injury or discomfort to the child. When installing a child restraint system Follow the directions given in the child restraint system installation manual and fix the child restraint system securely in place. If the child restraint system is not correctly fixed in place, the child or other passengers may be seriously injured or even killed in the event of sudden braking, sudden swerving or an accident.
When installing a child restraint system
When installing a child restraint system to the AUTO ACCESS SEAT (if equipped)
Do not use a seat belt extender If a seat belt extender is used when installing a child restraint system, the seat belt will not securely hold the child restraint system, which could cause death or serious injury to the child or other passengers in the event of sudden braking, sudden swerving or an accident. To correctly attach a child restraint system to the anchors When using the LATCH anchors, be sure that there are no foreign objects around the anchors and that the seat belt is not caught behind the child restraint system. Make sure the child restraint system is securely attached, or it may cause death or serious injury to the child or other passengers in the event of a sudden braking, sudden swerving or an accident. |

Exhaust gas precautions
Harmful substance to the human body is included in exhaust gases if inhaled.
| WARNING
Exhaust gases include harmful carbon monoxide (CO), which is colorless and odorless. Observe the following precautions. Failure to do so may cause exhaust gases enter the vehicle and may lead to an accident caused by light-headedness, or may lead to death or a serious health hazard. Important points while driving
When parking
Exhaust pipe The exhaust system needs to be checked periodically. If there is a hole or crack caused by corrosion, damage to a joint or abnormal exhaust noise, be sure to have the vehicle inspected and repaired by your Toyota dealer. |
Download Manual